
[教程] 安装使用了 MySQL/SQLite 的独立网页服务器
本文作者:haloflooder
🚨 警告 🚨
如果你在使用 Dynmap 时没有用到数据库,接下来的操作会重置所有数据。鉴于 Dynmap 在操作后会通过数据库保存/读取数据,之前渲染的图块会全部丢失。
Dynmap 的 MySQL 相关功能尚未得到社区的完全测试。使用时自行承担风险。
本教程假设你对 Linux 有初步了解。如果你还不知道,可以试着去了解一下!
如果你正在使用面板服之类的托管服务器,大多数情况下都没有办法直接设置独立网页服务器。你需要获取网络主机或购置一台 VPS 才可以为 Dynmap 架设独立网页服务器。
注意
- 如果能够选择,强烈建议使用 MySQL,而非 SQLite。虽然它的配置相对繁琐,但也有自己的优势。其他插件也可以使用 MySQL 😃
- 这个教程也会用到
sudo命令。如果你没有权限,可能就只能到此为止,或者需要购置一台 VPS。 - 如果你正在使用 SQLite,你不能将网页服务器部署到其他服务器或 VPS 上。如果要这么做,你需要把 SQLite 数据库迁移至 MySQL/MariaDB。不过这不是强制的,我们会在之后的教程里讲解如何在同一台机器上搭建独立网页服务器,并使用 SQLite 作为数据库。
- 除非我有兴趣,否则我不会在这里讲述如何在 Windows 或 Apache 上部署独立网页服务器。不过,如果你使用的是 MySQL(而非 SQLite),你还是可以购置一台廉价的 VPS 再部署网页服务器。
附加教程
- 我会在教程里讲到如何让网页服务器兼容 Cloudflare 的代理,这部分是完全可选的。如果你需要让玩家登录网页地图,非常推荐你这么做。如果你需要通过 certbot 安装 SSL 证书,那么不要照做。
- 我也会讲到如何通过 certbot 或其他证书提供方在 NGINX 网页服务器上安装 SSL 证书。如果你需要让玩家登录网页地图,非常推荐你这么做。如果你需要使用 Cloudflare 代理,那么不要照做。
优势与劣势
优势:
- Dynmap 网页地图会在服务器停止/重启期间正常运行。
- 减轻对 Minecraft 服务器本身的压力
- NGINX 性能优于内置网页服务器
劣势:
- 步骤繁琐
- 需要对 Linux 有基本了解
讲述内容
我们会讲到如下步骤:
- 安装与设置 MySQL/MariaDB(可选)
- 安装与设置支持 PHP 与 SQL 的 NGINX
- 让 Dynmap 插件使用 MySQL/SQLite
- 为 MySQL/SQLite 设置独立服务器
- 附加:通过 NGINX 网页服务器设置 Cloudflare 代理(可选)
- 附加:设置带有 SSL 证书的 NGINX(可选)
- 常见问题位于本教程底部。
安装与设置 MySQL/MariaDB
首先,你需要在运行 Dynmap 独立网页的服务器上安装网页服务器。这部分教程也会教你如何安装 MySQL。
如果你需要使用 SQLite,你也可以只安装 NGINX。但 NGINX 必须与 Minecraft 服务器处于同一实体机中。
若你正在使用的是网络主机(面板服),则请见下文教程链接。
我应该把 MySQL/MariaDB 安装在哪?
通常情况下安装在与 Minecraft 服务器的同一实体机上即可。你可以与其他插件共用一个 MySQL。Dynmap 和网页服务器都会使用 MySQL 保存/读取数据。
通常,同一服务器/网络下使用 MySQL/MariaDB 服务器延迟更低,因此优势更显著。
教程
网上的 nginx/MySQL/MariaDB 安装教程数不胜数,这里你可以找到不同 Linux 操作系统上的安装教程。
如果教程推荐你安装 MariaDB,不用太过担心,它与 MySQL 完全相同,且性能更好。
注意:其他发行版可能不适合这个教程,不过仍然值得用作参考。
在 Dynmap 上使用 Nginx 之前,你还需要安装 php7.4-fpm 以及 php-mysqli,分别用于网页聊天和 MySQL 接口。
在浏览器输入网页服务器 IP,检查网页服务器是否正常运行。如果访问失败,你的防火墙可能阻止了端口,或者你没有启动 nginx 服务器。
注意
- 如果你已经有网页服务器,那么可以跳过这步。不论有还是没有,你都需要架设 MySQL 服务器。
- 如果你正在使用上述提到的网络主机,你可以跳过这步,不过还是需要架设 MySQL 服务器。
- 如果你正在使用托管服务器(面板服),你需要购置一台 VPS 或网络主机。你的面板服最好附带了 MySQL 支持及服务,否则你就需要在 VPS 上安装 MySQL 服务器,同时需要为它预留充足的存储空间。
设置 MySQL(SQLite 用户请跳过)
Now, to setup the MySQL/MariaDB server.
现在,我们就可以着手设置 MySQL/MariaDB 服务器了。
推荐为每个应用新建账号密码不同的用户,并且限制各自的权限。
如果你正在搭建外置网页服务器,你也可以设置防火墙(iptables、firewalld、ufw 等),只允许网页服务器连接到数据库。
配置 MySQL/MariaDB 数据库
通过托管 Minecraft 服务器的终端,我们可以新建数据库并添加数据库用户。
在 MySQL/MariaDB 中新建数据表
log
mysql -u root -p
[若有则在此输入 mysql root 密码]
mysql> CREATE DATABASE <Dynmap 数据库名>;
mysql> exit
::: detail 示例
log
mysql -u root -p
[若有则在此输入 mysql root 密码]
mysql> CREATE DATABASE DynmapDatabase;
mysql> exit
:::
新建用户
注意:若 MySQL 与游戏共处一台设备,那么 <游戏服务器 IP> 需填 localhost。
log
mysql -u root -p
[若有则在此输入 mysql root 密码]
mysql> CREATE USER '<网页服务器用户名>'@'<网页服务器 IP>' IDENTIFIED BY '<密码>';
mysql> CREATE USER '<Dynmap 用户名>'@'<游戏服务器 IP>' IDENTIFIED BY '<密码>';
mysql> GRANT CREATE, DELETE, INSERT, SELECT, UPDATE, INDEX ON <Dynmap 数据库>.*TO '<网页服务器用户名>'@'<网页服务器 IP>';
mysql> GRANT CREATE, DELETE, INSERT, SELECT, UPDATE, INDEX ON <Dynmap 数据库>.* TO '<Dynmap 用户名>'@'<游戏服务器 IP>';
mysql> FLUSH PRIVILEGES;
mysql> exit
::: detail MySQL 与游戏共处一台设备的指令示例(点击展开)
log
mysql -u root -p
[若有则在此输入 mysql root 密码]
mysql> CREATE USER 'dynmapwebserver'@'localhost' IDENTIFIED BY 'password1234';
mysql> CREATE USER 'minecraftserver'@'localhost' IDENTIFIED BY 'password5678';
mysql> GRANT CREATE, DELETE, INSERT, SELECT, UPDATE, INDEX ON 'dynmapwebserver'@'localhost';
mysql> GRANT CREATE, DELETE, INSERT, SELECT, UPDATE, INDEX ON 'minecraftserver'@'localhost'';
mysql> FLUSH PRIVILEGES;
mysql> exit
:::
若你不小心输错了某个参数,需要删除整个用户,你可以这样做:
log
mysql> DROP USER '<待删除用户>'@'<你使用的 IP>';新建完用户之后,尝试以这个身份登录。(需要先输入 exit 从当前 mysql root 用户登出)
log
mysql -u <网页服务器用户名> -p
[在此输入密码]
mysql> exit
MySQL 权限
MySQL 可以给其下用户这些权限。
- ALL PRIVILEGES - 获得所有权限
- CREATE - 允许新建数据库/表
- DELETE - 允许删除表中数据行
- DROP - 允许用户删除数据库/表
- INSERT - 允许向表中插入数据行
- SELECT - 允许用户自数据库中读取数据
- UPDATE - 允许用户更新表中数据
Dynmap 配置
现在就可以来着手配置插件了。
安装 Dynmap
在服务器上安装最新版本的 Dynmap。最新版本兼容从 1.12.2 到 1.21.11 的所有版本。
开启再关闭
启动一次 Minecraft 服务器,随后关闭。plugins 文件随后会出现一个 dynmap 文件夹。
先备份 configuration.txt 文件!只需将其复制到别的地方并重命名成 configuration.txt.backup 之类的名称即可。
之后,打开 configuration.txt,准备接下来的改动。
修改存储
找到如下这部分的配置
YAML
storage:
  # Filetree storage (standard tree of image files for maps)
  type: filetree
  # SQLite db for map storage (uses dbfile as storage location)
  #type: sqlite
  #dbfile: dynmap.db
  # MySQL DB for map storage (at 'hostname':'port' with flags "flags" in database 'database' using user 'userid' password 'password' and table prefix 'prefix')
  #type: mysql
  #hostname: localhost
  #port: 3306
  #database: dynmap
  #userid: dynmap
  #password: dynmap
  #prefix: ""
  #flags: "?allowReconnect=true&autoReconnect=true"
将其改为
::: detail MySQL 示例(点击展开)
YAML
storage:
  # Filetree storage (standard tree of image files for maps)
  #type: filetree <- DONT FORGET TO COMMENT THIS OUT
  # SQLite db for map storage (uses dbfile as storage location)
  #type: sqlite
  #dbfile: dynmap.db
  # MySQL DB for map storage (at 'hostname':'port' with flags "flags" in database 'database' using user 'userid' password 'password' and table prefix 'prefix')
  type: mysql
  hostname: <mysql_ip>
  port: <mysql_port>
  database: <mysql_database>
  userid: <dynmap_mysql_user>
  password: <dynmap_mysql_password>
  prefix: "" # Can add prefix for tables if you want
  flags: "?allowReconnect=true&autoReconnect=true"
:::
::: detail SQlite 示例(点击展开)
YAML
storage:
  # Filetree storage (standard tree of image files for maps)
  #type: filetree <- DONT FORGET TO COMMENT THIS OUT
  # SQLite db for map storage (uses dbfile as storage location)
  type: sqlite
  dbfile: dynmap.db
  # MySQL DB for map storage (at 'hostname':'port' with flags "flags" in database 'database' using user 'userid' password 'password' and table prefix 'prefix')
  #type: mysql
  #hostname: localhost
  #port: 3306
  #database: dynmap
  #userid: dynmap
  #password: dynmap
  #prefix: ""
  #flags: "?allowReconnect=true&autoReconnect=true"
:::
修改组件设置
在存储部分,有一个名为 - class: org.dynmap.InternalClientUpdateComponent 的设置。
它看起来会像这样:
::: deatil 前(点击展开)
YAML
  - class: org.dynmap.InternalClientUpdateComponent
    sendhealth: true
    sendposition: true
    allowwebchat: true
    webchat-interval: 5
    hidewebchatip: true
    trustclientname: false
    includehiddenplayers: false
    # (optional) if true, color codes in player display names are used
    use-name-colors: false
    # (optional) if true, player login IDs will be used for web chat when their IPs match
    use-player-login-ip: true
    # (optional) if use-player-login-ip is true, setting this to true will cause chat messages not matching a known player IP to be ignored
    require-player-login-ip: false
    # (optional) block player login IDs that are banned from chatting
    block-banned-player-chat: true
    # Require login for web-to-server chat (requires login-enabled: true)
    webchat-requires-login: false
    # If set to true, users must have dynmap.webchat permission in order to chat
    webchat-permissions: false
    # Limit length of single chat messages
    chatlengthlimit: 256
  #  # Optional - make players hidden when they are inside/underground/in shadows (#=light level: 0=full shadow,15=sky)
  #  hideifshadow: 4
  #  # Optional - make player hidden when they are under cover (#=sky light level,0=underground,15=open to sky)
  #  hideifundercover: 14
  #  # (Optional) if true, players that are crouching/sneaking will be hidden
    hideifsneaking: false
    # If true, player positions/status is protected (login with ID with dynmap.playermarkers.seeall permission required for info other than self)
    protected-player-info: false
    # If true, hide players with invisibility potion effects active
    hide-if-invisiblity-potion: true
    # If true, player names are not shown on map, chat, list
    hidenames: false
:::
::: 后(点击展开)
YAML
 # - class: org.dynmap.InternalClientUpdateComponent
    #sendhealth: true
    #sendposition: true
    #allowwebchat: true
    #webchat-interval: 5
    #hidewebchatip: false
    #trustclientname: false
    #includehiddenplayers: false
    # (optional) if true, color codes in player display names are used
    #use-name-colors: false
    # (optional) if true, player login IDs will be used for web chat when their IPs match
    #use-player-login-ip: true
    # (optional) if use-player-login-ip is true, setting this to true will cause chat messages not matching a known player IP to be ignored
    #require-player-login-ip: false
    # (optional) block player login IDs that are banned from chatting
    #block-banned-player-chat: true
    # Require login for web-to-server chat (requires login-enabled: true)
    #webchat-requires-login: false
    # If set to true, users must have dynmap.webchat permission in order to chat
    #webchat-permissions: false
    # Limit length of single chat messages
    #chatlengthlimit: 256
  #  # Optional - make players hidden when they are inside/underground/in shadows (#=light level: 0=full shadow,15=sky)
  #  hideifshadow: 4
  #  # Optional - make player hidden when they are under cover (#=sky light level,0=underground,15=open to sky)
  #  hideifundercover: 14
  #  # (Optional) if true, players that are crouching/sneaking will be hidden
    #hideifsneaking: false
    # If true, player positions/status is protected (login with ID with dynmap.playermarkers.seeall permission required for info other than self)
    #protected-player-info: false
    # If true, hide players with invisibility potion effects active
    #hide-if-invisiblity-potion: true
    # If true, player names are not shown on map, chat, list
    #hidenames: false
:::
将其注释后,你需要将其下部分原本的注释取消。就像这样。
::: detail 前(点击展开)
YAML
  #- class: org.dynmap.JsonFileClientUpdateComponent
  #  writeinterval: 1
  #  sendhealth: true
  #  sendposition: true
  #  allowwebchat: true
  #  webchat-interval: 5
  #  hidewebchatip: false
  #  includehiddenplayers: false
  #  use-name-colors: false
  #  use-player-login-ip: false
  #  require-player-login-ip: false
  #  block-banned-player-chat: true
  #  hideifshadow: 0
  #  hideifundercover: 0
  #  hideifsneaking: false
  #  # Require login for web-to-server chat (requires login-enabled: true)
  #  webchat-requires-login: false
  #  # If set to true, users must have dynmap.webchat permission in order to chat
  #  webchat-permissions: false
  #  # Limit length of single chat messages
  #  chatlengthlimit: 256
  #  hide-if-invisiblity-potion: true
  #  hidenames: false
:::
::: detail 后(点击展开)
YAML
  - class: org.dynmap.JsonFileClientUpdateComponent
    writeinterval: 1
    sendhealth: true
    sendposition: true
    allowwebchat: true
    webchat-interval: 5
    hidewebchatip: false
    includehiddenplayers: false
    use-name-colors: false
    use-player-login-ip: false
    require-player-login-ip: false
    block-banned-player-chat: true
    hideifshadow: 0
    hideifundercover: 0
    hideifsneaking: false
  #  # Require login for web-to-server chat (requires login-enabled: true)
    webchat-requires-login: false
  #  # If set to true, users must have dynmap.webchat permission in order to chat
    webchat-permissions: false
  #  # Limit length of single chat messages
    chatlengthlimit: 256
    hide-if-invisiblity-potion: true
    hidenames: false
:::
禁用内置网页服务器
现在我们需要禁用之后不再会用到的内置网页服务器。
找到配置文件中的 disable-webserver 部分,将其从 false 修改为 true。
修改网页服务器路径
为了让 Dynmap 独立网页服务器能够正常运行,我们还需要修改一些路径。这一步是据我所知目前人们碰到问题最多的。
::: detail 前(点击展开)
YAML
url:
    # configuration URL
    #configuration: "up/configuration"
    # update URL
    #update: "up/world/{world}/{timestamp}"
    # sendmessage URL
    #sendmessage: "up/sendmessage"
    # login URL
    #login: "up/login"
    # register URL
    #register: "up/register"
    # tiles base URL
    #tiles: "tiles/"
    # markers base URL
    #markers: "tiles/"
:::
::: detail 后 [MySQL 示例](点击展开)
YAML
url:
    # configuration URL
    configuration: "standalone/MySQL_configuration.php"
    # update URL
    update: "standalone/MySQL_update.php?world={world}&ts={timestamp}"
    # sendmessage URL
    sendmessage: "standalone/MySQL_sendmessage.php"
    # login URL
    login: "standalone/MySQL_login.php"
    # register URL
    register: "standalone/MySQL_register.php"
    # tiles base URL
    tiles: "standalone/MySQL_tiles.php?tile="
    # markers base URL
    markers: "standalone/MySQL_markers.php?marker="
:::
::: detail 后 [SQLite 示例] (点击展开)
YAML
url:
    # configuration URL
    configuration: "standalone/dynmap_config.json?={timestamp}"
    # update URL
    update: "standalone/dynmap_{world}.json?_={timestamp}"
    # sendmessage URL
    sendmessage: "standalone/sendmessage.php"
    # login URL
    login: "standalone/login.php"
    # register URL
    register: "standalone/register.php"
    # tiles base URL
    tiles: "standalone/SQLite_tiles.php?tile="
    # markers base URL
    markers: "standalone/SQLite_markers.php?marker="
:::
再次开启再关闭
再次开启 Minecraft 服务器,但别急着关掉!检查控制台日志,确认 Dynmap 没有产生报错。如果没有问题,之后就可以关掉服务器。
注意
重启服务器的根本原因在于 Dynmap 需要创建网页服务器使用的配置文件。如果你修改了 configuration.txt 里的设置,那么它有可能会改变 plugins/dynmap/web(对于 Forge 则是 dynmap/web)中的配置。
更加需要注意
如果你允许玩家登入 Dynmap,你最好安装 SSL 证书,或使用 Cloudflare 的代理服务,让登录凭据免遭有心者利用!
安装网页服务器的选项
现在我们来到了重要的部分!
这里有些选项:
与游戏服务器同处一台机器(MySQL/SQLite)
选择甲:你可以将网页服务器链接到 plugins 文件夹中的 dynmap/web 文件夹(相对简单)
选择乙:你可以将 web 文件夹复制到服务器上的其他地方(相对安全)
与游戏服务器分别位于不同机器(MySQL)
唯一选择:将 web 文件夹复制到需要托管网页服务器的存储中。
网络主机设置(MySQL)
若你正在使用诸如 hostgator、namecheap 或 000webhost 等的网络主机服务。你唯一的选择就是将 web 文件夹复制到对应的托管服务存储中。鉴于不同提供商的实现方式及操作流程各不相同,我不会在此详细讲述如何完成这一操作。
安装 NGINX 网页服务器
在你阅读下一部分的安装选项之前,我们会讲述安装 NGINX 网页服务器的大致安装步骤。
删除默认网站配置
如果你新安装了一个 NGINX 网页服务器,我们需要先移除默认配置,然后填入我们自己的。如果你在教程之前就已经安装了 NGINX 且能够承担风险,跳到下一部分继续设置 Dynmap 网站即可。
默认配置一般位于 /etc/nginx/sites-available/ 和 /etc/nginx/sites-enabled。
复制默认配置,我们用得到。
bash
sudo cp /etc/nginx/sites-available/default /etc/nginx/sites-available/dynmap现在,移除 sites-enabled 默认配置,禁用默认网站配置,重启 nginx 网页服务器
bash
sudo rm /etc/nginx/sites-enabled/default
sudo service nginx restart
在一台机器上设置网页服务器
如果你的 NGINX 网页服务器与游戏服务器处于同一台设备,请继续往下读。
注意:确保你在开始这部分之前阅读了上述的 NGINX 设置教程。
选择甲:将网页服务器连接到 Dynmap 文件夹
如果你想要简单(而非安全)设置网页服务器。你可以这样做!不过我还是非常建议你跟着下一个选择的教程走,这样会更加安全一些。
好处:
- 无需过多操作(命令少于一条)
- 修改配置后无需复制配置文件
坏处:
- 相较选择乙更加不安全(存疑)
编辑网页配置文件
编辑 /etc/nginx/sites-available/dynmap 下的 Dynmap 网页配置文件。
输入 sudo nano /etc/nginx/sites-available/dynmap 或 sudo vi /etc/nginx/sites-available/dynmap 命令即可。
配置文件应该看起来像这样。根据你的需要修改配置的值。
apache
server {
        listen 80 default_server;
        listen [::]:80 default_server;
        server_name _;

        root /home/<用户名称>/<游戏服务器>/plugins/dynmap/web;

        index index.php index.html index.htm;

        location / {
                # First attempt to serve request as file, then
                # as directory, then fall back to displaying a 404.
                try_files $uri $uri/ =404;
        }

        # pass PHP scripts to FastCGI server

        location ~ \.php$ {
                include snippets/fastcgi-php.conf;

                # With php-fpm (or other unix sockets):
                fastcgi_pass unix:/var/run/php/php7.2-fpm.sock;
        #       # With php-cgi (or other tcp sockets):
        #       fastcgi_pass 127.0.0.1:9000;
        }

        # deny access to .htaccess files, if Apache's document root
        # concurs with nginx's one
        #
        location ~ /\.ht {
                deny all;
        }
}- 务必将其改为带有游戏服务器的 linux 用户名。
- 务必将其改为带有游戏服务器的文件夹路径。
- 使用
服务器名称 map.domain.com;而非服务器名称 _;的格式,这样可以将其路由引向指定域名而非主域名。
示例:
root /home/someuser/minecraft/servers/creative/plugins/dynmap/web;
选择乙:将 web 文件夹复制到其他位置
如果你想要让网页服务器变得更安全,这个方法适合你!
好处:
- 相较选择甲更加安全(存疑)
坏处:
- 如果更新了 Dynmap 配置,需要将部分配置文件复制到新位置
将文件复制到新位置
将 Dynmap 的网页文件复制到其他位置:
sudo cp -r /home/<用户名称>/<游戏服务器>/plugins/dynmap/web/ /var/www/dynmap/
- 务必将其改为带有游戏服务器的 linux 用户名。
- 务必将其改为带有游戏服务器的文件夹路径。
示例:
sudo cp -r /home/MyUsername/minecraft/servers/creative/plugins/dynmap/web/ /var/www/dynmap/
编辑网页配置文件
找到并打开 /etc/nginx/sites-available/dynmap 下的 Dynmap 配置文件。
输入 sudo nano /etc/nginx/sites-available/dynmap 或 sudo vi /etc/nginx/sites-available/dynmap 命令即可。
配置文件应该看起来像这样。根据你的需要修改配置的值。
apache
server {
        listen 80 default_server;
        listen [::]:80 default_server;
        server_name map.example.com;

        root /var/www/dynmap;

        index index.php index.html index.htm;

        location / {
                # First attempt to serve request as file, then
                # as directory, then fall back to displaying a 404.
                try_files $uri $uri/ =404;
        }

        # pass PHP scripts to FastCGI server

        location ~ \.php$ {
                include snippets/fastcgi-php.conf;

                # With php-fpm (or other unix sockets):
                fastcgi_pass unix:/var/run/php/php7.2-fpm.sock;
        #       # With php-cgi (or other tcp sockets):
        #       fastcgi_pass 127.0.0.1:9000;
        }

        # deny access to .htaccess files, if Apache's document root
        # concurs with nginx's one
        #
        location ~ /\.ht {
                deny all;
        }
}
公开 Dynmap 服务器(选择甲乙均适用)
在完成了选择甲或乙中的步骤后,我们将要为 Dynmap 网页服务器配置新建快捷方式,并将其放在文件夹中。
ln -s /etc/nginx/sites-available/dynmap /etc/nginx/sites-enabled/dynmap
确保配置文件没有语法错误!
sudo nginx -t
确认无误后,重启服务器。
sudo service nginx restart
就是这样!
在浏览器中输入网页服务器的地址,你就能看到 Dynmap 网页地图了。不过一般情况下这里是一片空白,因此你可以在游戏内输入 /dynmap fullrender <世界名称> 开始一次完整渲染。
在不同的服务器上部署网页服务器
如果你正在不同的服务器上部署 NGINX 网页服务器,你可以详细浏览这部分教程!
注意
- 确保你在开始这部分教程之前阅读了上述的 NGINX 设置教程。
- 网站配置应当位于部署了 NGINX 的网页服务器上,而非游戏服务器!
好处:
- 相比其他方法更为安全
坏处:
- 如果更新了 Dynmap 配置,需要将部分配置文件复制到新位置
将文件复制到新的位置。
将 Dynmap 的网页文件夹复制到其他位置
在游戏所在服务器上输入这个命令。这个命令会将游戏服务器中的内容转移到网页服务器。它还会要求你输入网页服务器的密码。
sudo scp -r /home/<用户名称>/<游戏服务器>/plugins/dynmap/web <网页服务器用户名称>@<网页服务器 IP>:/var/www/dynmap
- 务必将其改为带有游戏服务器的 linux 用户名。
- 务必将其改为带有游戏服务器的文件夹路径。
示例:
sudo scp -r /home/SomeUserName1/minecraft/servers/creative/plugins/dynmap/web SomeUserName2@123.123.123.123:/var/www/dynmap
编辑网站配置文件
找到并打开 /etc/nginx/sites-available/dynmap 下的 Dynmap 配置文件。
输入 sudo nano /etc/nginx/sites-available/dynmap 或 sudo vi /etc/nginx/sites-available/dynmap 命令即可。
配置文件应该看起来像这样。根据你的需要修改配置的值。
apache
server {
        listen 80 default_server;
        listen [::]:80 default_server;
        server_name map.example.com;

        root /var/www/dynmap;

        index index.php index.html index.htm;

        location / {
                # First attempt to serve request as file, then
                # as directory, then fall back to displaying a 404.
                try_files $uri $uri/ =404;
        }

        # pass PHP scripts to FastCGI server

        location ~ \.php$ {
                include snippets/fastcgi-php.conf;

                # With php-fpm (or other unix sockets):
                fastcgi_pass unix:/var/run/php/php7.2-fpm.sock;
        #       # With php-cgi (or other tcp sockets):
        #       fastcgi_pass 127.0.0.1:9000;
        }

        # deny access to .htaccess files, if Apache's document root
        # concurs with nginx's one
        #
        location ~ /\.ht {
                deny all;
        }
}
现在就可以开放服务器了!
在完成了选择甲或乙中的步骤后,我们将要为 Dynmap 网页服务器配置新建快捷方式,并将其放在文件夹中。
ln -s /etc/nginx/sites-available/dynmap /etc/nginx/sites-enabled/dynmap
确保配置文件没有语法错误!
sudo nginx -t
确认无误后,重启服务器。
sudo service nginx restart
就是这样!
在浏览器中输入网页服务器的地址,你就能看到 Dynmap 网页地图了。不过一般情况下这里是一片空白,因此你可以在游戏内输入 /dynmap fullrender <世界名称> 开始一次完整渲染。
部署非网络主机的网页服务器
如果你因为嫌麻烦而正在使用网络主机,请你继续往下阅读!
将网页文件夹复制到网络主机
将游戏服务器的 plugins/dynmap/web 文件夹复制到你的电脑上。
将这些文件移动到网络主机的新建目录,除非你要使用专用 Dynmap 网络主机。
大功告成!
真的!你做完了。
额外教程
如果你安装了自己的 NGINX 网页服务器,你可以按照这部分的额外教程让 Dynmap 网页地图的登录过程更加安全。如果允许用户登入,你应当更加小心对待用户的登录凭据。
你可以从下面的三个选择中选择,让服务器更加安全。
通过 CartBot 安装免费的 SSL 证书
你可以按照 certbot 网站的这些步骤进行安装。这是网站获取 SSL 证书最简单的方式。
需要注意的是,certbot 的证书相较其他提供方更容易过期,不过他们提供了自动刷新证书的方式,跟随教程即可了解详情。
从其他来源安装 SSL 证书
作为代替方法,你可以从诸如 NameCheap 这样的提供方处获得 SSL 证书。只需下载公开证书及私钥即可。请注意不要将私钥分享给他人或公开传播。它只属于你的服务器,不应该被暴露。
将证书文件放置在 /etc/ssl/certs/<证书文件>.pem。将私钥文件放置在 /etc/ssl/private/<私钥文件>.pem
在进行下一步操作之前,对网站配置进行备份:
sudo cp /etc/nginx/sites-available/dynmap /etc/nginx/sites-available/dynmap_BACKUP
如果你不小心写错了配置,需要回退,则请使用这个命令:
sudo cp /etc/nginx/sites-available/dynmap_BACKUP /etc/nginx/sites-available/dynmap
在 NGINX 网站配置中,找到和你当前配置的不同之处,并按如下示例所说增加有区别的部分。
apache
server {
        listen 80 default_server;
        listen [::]:80 default_server;
        server_name map.example.com;
        return 302 https://$server_name$request_uri;
}

server {
        # SSL configuration

        listen 443 ssl http2;
        listen [::]:443 ssl http2;

        ssl_certificate         /etc/ssl/certs/<certification_file>.pem;
        ssl_certificate_key     /etc/ssl/private/<private_key_file>.pem;

        server_name map.example.com;

        root /var/www/dynmap;

        index index.php index.html index.htm;

        location / {
                # First attempt to serve request as file, then
                # as directory, then fall back to displaying a 404.
                try_files $uri $uri/ =404;
        }

        # pass PHP scripts to FastCGI server

        location ~ \.php$ {
                include snippets/fastcgi-php.conf;

                # With php-fpm (or other unix sockets):
                fastcgi_pass unix:/var/run/php/php7.2-fpm.sock;
        #       # With php-cgi (or other tcp sockets):
        #       fastcgi_pass 127.0.0.1:9000;
        }

        # deny access to .htaccess files, if Apache's document root
        # concurs with nginx's one
        #
        location ~ /\.ht {
                deny all;
        }
}
之后只需重启服务器即可。
sudo service nginx restart
打开你的 Dynmap 网页地图,它现在变得更安全了!
通过 Cloudflare 代理设置 NGINX(最后更新:2019 年 9 月 19 日)
关于 Cloudflare 的一大好处就是,它们有只在你的网页服务器和服务之间共享的特殊证书。你能让证书保持 15 年的有效期。但是,它只是用来代替“真实”SSL 证书的代替方法。
首先,登录 Cloudflare 并前往你要设置代理的域名。找到“SSL/TLS”部分:
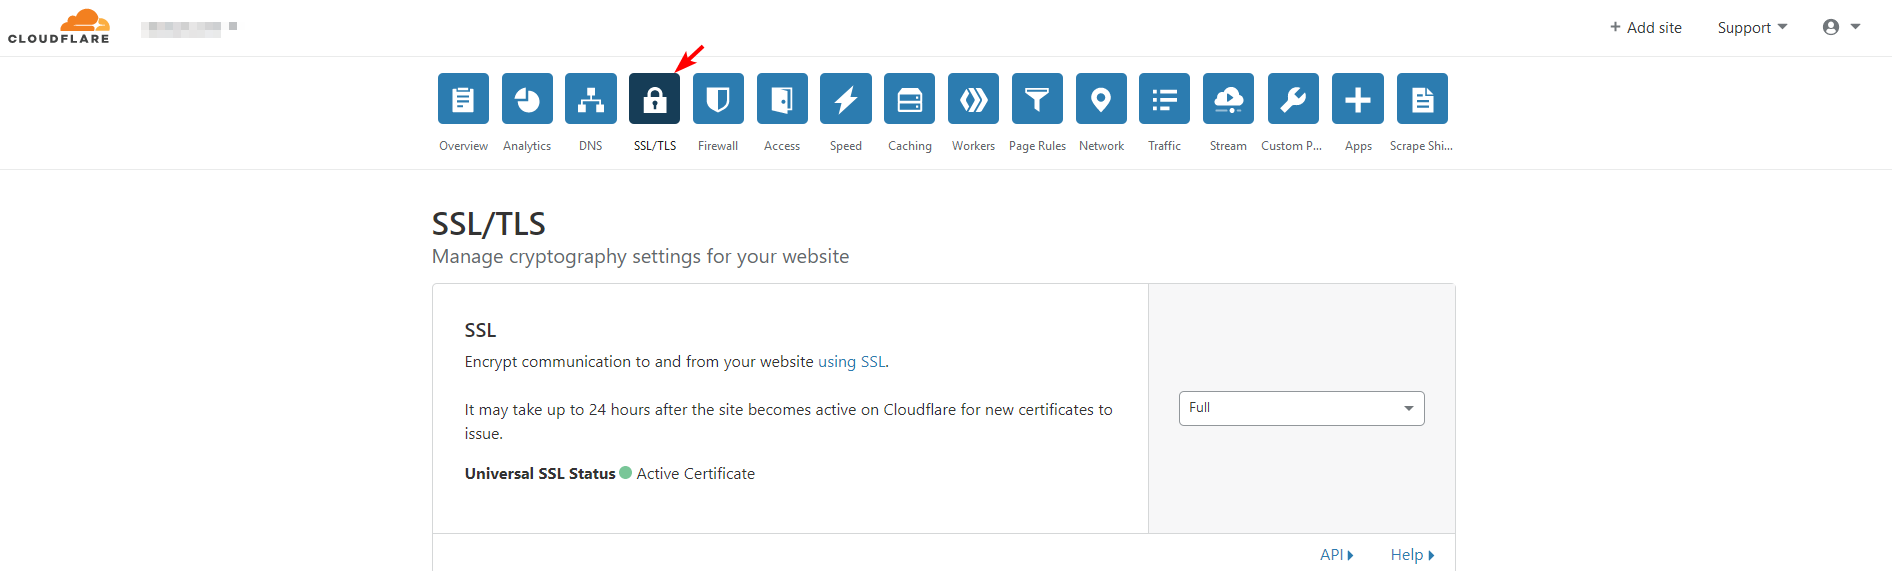
在 Origin Certificates(证书源)部分,点击“Create Certificate”(新建证书)。选择 Let Cloudflare generate a private key and a CSR(自动生成私钥与 CSR),将 Private Key Type(私钥类型)设置为 ECDSA。
如果你需要让网页地图通过 map.YOURDOMAIN.com 域名打开,那么将对应域名填入。
为证书设置有效期(例如 15 年)。
点击下一步,你应该就能看到一个新鲜的 SSL 证书及私钥。复制文本并通过终端将其写入文件。
首先,新建证书文件,将文本放入。这段文本的开头应当是 -----BEGIN CERTIFICATE-----,结尾应当是 -----END CERTIFICATE-----。
通过命令 sudo nano /etc/ssl/certs/dynmap_cert.pem 或 sudo vi /etc/ssl/certs/dynmap_cert.pem 将其保存。
然后,新建私钥文件,将文本放入。这段文本的开头应当是 -----BEGIN PRIVATE KEY-----,结尾应当是 -----END PRIVATE KEY-----。
通过命令 sudo nano /etc/ssl/private/dynmap_private_key.pem 或 sudo vi /etc/ssl/private/dynmap_private_key.pem 将其保存。
现在我们需要编辑 NGINX 网站配置。在编辑前先做好备份:
sudo cp /etc/nginx/sites-available/dynmap /etc/nginx/sites-available/dynmap_BACKUP
如果你不小心写错了配置,需要回退,则请使用这个命令:
sudo cp /etc/nginx/sites-available/dynmap_BACKUP /etc/nginx/sites-available/dynmap
在 NGINX 网站配置中,找到和你当前配置的不同之处,并按如下示例所说增加有区别的部分。
apache
server {
        listen 80 default_server;
        listen [::]:80 default_server;
        server_name map.example.com;
        return 302 https://$server_name$request_uri;
}

server {
        # SSL configuration

        listen 443 ssl http2;
        listen [::]:443 ssl http2;

        ssl_certificate         /etc/ssl/certs/dynmap_cert.pem;
        ssl_certificate_key     /etc/ssl/private/dynmap_private_key.pem;

        server_name map.example.com;

        root /var/www/dynmap;

        index index.php index.html index.htm;

        location / {
                # First attempt to serve request as file, then
                # as directory, then fall back to displaying a 404.
                try_files $uri $uri/ =404;
        }

        # pass PHP scripts to FastCGI server

        location ~ \.php$ {
                include snippets/fastcgi-php.conf;

                # With php-fpm (or other unix sockets):
                fastcgi_pass unix:/var/run/php/php7.2-fpm.sock;
        #       # With php-cgi (or other tcp sockets):
        #       fastcgi_pass 127.0.0.1:9000;
        }

        # deny access to .htaccess files, if Apache's document root
        # concurs with nginx's one
        #
        location ~ /\.ht {
                deny all;
        }
}
之后只需重启服务器即可。
sudo service nginx restart
打开你的 Dynmap 网页地图,它现在变得更安全了!
非常安全。
常见问题
::: detail 我如何操作 Linux?
非常小心。
这里确实有个严肃的答案。你可以通过 PuTTY 或者其他 SSH 客户端连接到 linux 服务器。如果你有账号密码,还可以登录终端。
你也可以在网络上找到如何使用 linux 的教程。但不管执行什么命令,都应该先检查它的实际作用!
:::
::: detail 我的网页不显示(NGINX)
确保你的网站端口已经被转发。
默认端口为 80,如果你跟随安装 SSL 证书的教程,那么它是 443。
但如果这还不能奏效的话,通过如下命令检查 NGINX 是否正常运行:
sudo service nginx status
这可以帮你检查潜在的错误。你也可以通过如下命令测试配置文件:
nginx -t
:::
::: detail 网页地图上没有任何图片!
因为我们新建了一个空白的数据库,需要等一段时间才能看到。
你可以在游戏内输入这个命令,开始一次完整渲染:/dynmap fullrender <世界名称>。
:::
::: detail 为什么没有针对 Windows 或者 Apache 的教程?
因为现在的人们大多使用 Linux 与 NGINX,所以我不会涵盖这两个操作系统。不过如果呼声够高,我可能会考虑补充这两个操作平台。
:::
::: detail 我改变主意了,能换回 SQL 吗?
当然可以,如果你根据之前的教程创建了备份配置文件 configuration.txt.backup,你随时都可以切换到原本的设置。
只需删除 configuration.txt,并将你的备份文件重命名为 configuration.txt,就能切换回去了!
:::
::: detail 为什么要用 MySQL/SQlite?
那又为什么不呢?
Dynmap 使用 SQL 时才有更多的可能性。即便游戏服务器关闭,玩家仍然可以借助它们浏览服务器地图,还有更多功能!
:::
::: detail 网页界面仍然显示玩家图标和/或聊天栏?
是的,玩家图标及聊天栏内容仍然会继续更新,但只在服务器运行时有效。
:::
贡献者
 SnowCutieOwO
页面历史
此处原图缺失。 ↩︎